GitHub - jinmidnight01/powersell_frontend
Contribute to jinmidnight01/powersell_frontend development by creating an account on GitHub.
github.com
본 내용의 코드는 전부 위 링크에 있으니 참고바랍니다
관리자 페이지: 상품/후기 목록 (ProductListPage.js)
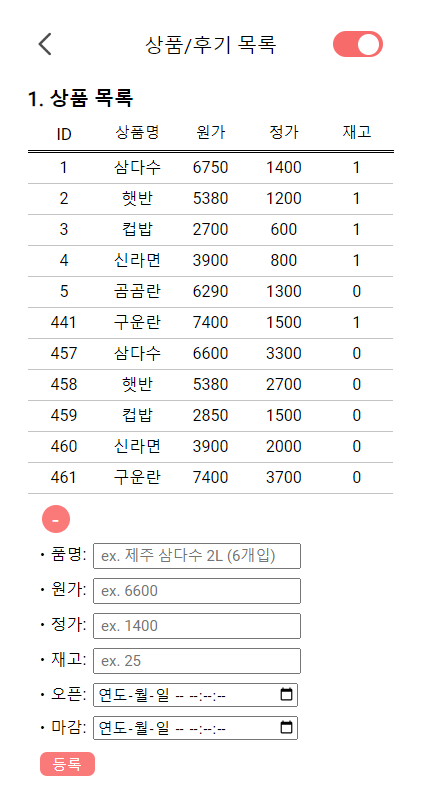
전 상품 정보 GET
- useEffect를 통해 최초 렌더링 시에만 작동
- useState를 통해 products 상태를 GET한 전 상품정보로 set
- useState를 통해 전 상품정보를 GET할 경우 loading 상태 false로 변경
...
  // REST API 2-1: get all items
  useEffect(() => {
    if (props.status === 200) {
      axios
        .get(`${hostURL}/api/items`)
        .then((response) => {
          setProducts(response.data);
          setIsProductLoading(false);
        })
        .catch((error) => {
          console.log(error);
        });
    }
  }, [props.status, isClicked]);
...
- map 함수를 통해 전 상품 나열
- key를 itemId로 설정
return
...
  [...products].map((product) => {
    return (
      <div
        onClick={() => setSelectedProduct(product)}
        key={product.itemId}
      >
        <div className={styles.productStyle}>
          <div>{product.itemId}</div>
          <div>{productNewName}</div>
          <div>{product.originalPrice}</div>
          <div>{product.price}</div>
          <div>{product.stockQuantity}</div>
        </div>
      </div>
    );
  })
...
새 상품 POST
- toggle buton으로 새 상품 추가 form을 열고 닫을 수 있음
return
...
  <input
    type="button"
    className={styles.addProductToggle}
    onClick={() => { toggleStatus === "+" ? setToggleStatus("-") : setToggleStatus("+") }}
    value={toggleStatus}
  ></input>
  <div className={styles.addProduct} style={toggleStatus === "+" ? { display: "none" } : { display: "block" }}>
...
1. 새 상품 input 객체 생성
- 상품명, 원가, 정가, 재고, 오픈 시간, 마감 시간을 속성으로 갖고 있음
...
  // 상품명, 원가, 정가, 재고, 오픈 시간, 마감 시간
  const [inputs, setInputs] = useState({
    name: "",
    originalPrice: "",
    price: "",
    stockQuantity: "",
    startDate: "",
    endDate: "",
  });

  const { name, originalPrice, price, stockQuantity, startDate, endDate } = inputs;

  // input 객체 생성
  const onChange = (e) => {
    const { value, name } = e.target;
    setInputs({
      ...inputs,
      [name]: value,
    });
  };
...
2. input 객체 POST
- input 값 형식 확인 후 주문 POST 진행
- 오픈 시간과 마감 시간 데이터 형식을 refine
- 새 상품 추가 후 상품 form 초기화
- POST 완료 시 상품 목록 reload
...
  // refine date format
  const refineDate = (date) => {
    if (date.length === 16) {
      return date.replace("T", " ") + ":00";
    } else {
      return date.replace("T", " ");
    }
  };

  // REST API 2-2: add product
  const handleClick = () => {
    // check if all inputs are filled
    if (name.length === 0 || startDate.length === 0 || endDate.length === 0 || originalPrice.length === 0 || price.length === 0 || stockQuantity.length === 0) {
      alert("모든 항목을 입력해주세요");
      return;
    }

    // input data for submit
    const inputs = {
      name: name,
      originalPrice: Number(originalPrice),
      price: Number(price),
      stockQuantity: Number(stockQuantity),
      startDate: refineDate(startDate),
      endDate: refineDate(endDate),
    };

    // 상품 추가
    axios
      .post(`${hostURL}/api/admin/items`, inputs)
      .then((response) => {
        // 상품 form 초기화
        setInputs({
          name: "",
          originalPrice: "",
          price: "",
          stockQuantity: "",
          startDate: "",
          endDate: "",
        });
        setToggleStatus("-");

        // 상품 목록 reload
        if (isClicked === 0) {
          setIsClicked(1);
        } else {
          setIsClicked(0);
        }
      })
      .catch((error) => {
        console.log(error);
      });
  };
...
기존 상품 PUT
- props를 product, onClose, onSave, onChnage로 지닌 하위 컴포넌트 ProductModal.js 생성
- 상품 정보 클릭을 통해 ProductModal 오픈
return
...
  {selectedProduct && (
    <div className={styles.productUpdate}>
      <ProductModal
        product={selectedProduct}
        onClose={() => setSelectedProduct(null)}
        onSave={handleSave}
        onChange={onChange}
      />
    </div>
  )}
...
1. 상품 input 객체 수정
- 상품명, 원가, 정가, 재고, 오픈 시간, 마감 시간을 속성으로 갖고 있음
// ProductModal.js
...
  const [updatedProduct, setUpdatedProduct] = useState(product);

  // input 객체 재생성
  const handleInputChange = (e) => {
    const { name, value } = e.target;
    setUpdatedProduct((prev) => ({ ...prev, [name]: value }));
  };
...
2. 수정된 상품 input 객체 PUT
- props로 받은 onSave 속성의 handleSave 함수를 통해 PUT request 실행 후 ProductModal 닫기
- input 값 형식 확인 후 상품 PUT 진행
- 오픈 시간과 마감 시간 데이터 형식을 refine
- PUT 완료 시 상품 목록 reload
...
  // REST API 2-4: update product
  const handleSave = (updatedProduct) => {
    // check if all inputs are filled
    if (updatedProduct.name.length === 0 || updatedProduct.startDate.length === 0 || updatedProduct.endDate.length === 0 || updatedProduct.originalPrice.length === 0 || updatedProduct.price.length === 0 || updatedProduct.stockQuantity.length === 0) {
      alert("모든 항목을 입력해주세요");
      return;
    }

    // input data for submit
    const inputs = {
      name: updatedProduct.name,
      originalPrice: Number(updatedProduct.originalPrice),
      price: Number(updatedProduct.price),
      stockQuantity: Number(updatedProduct.stockQuantity),
      startDate: refineDate(updatedProduct.startDate),
      endDate: refineDate(updatedProduct.endDate),
    };

    // 상품 수정
    axios
      .put(`${hostURL}/api/admin/items/${updatedProduct.itemId}`, inputs)
      .then((response) => {
        // product Modal 닫기
        setSelectedProduct(null);
        // 상품 목록 reload
        if (isClicked === 0) {
          setIsClicked(1);
        } else {
          setIsClicked(0);
        }
      })
      .catch((error) => {
        console.log(error);
      });
  };
...
서비스 후기 목록 GET

- useEffect를 통해 최초 렌더링 시에만 작동
- useState를 통해 feedback 상태를 GET한 후기 목록으로 set
- useState를 통해 후기 목록을 GET할 경우 loading 상태 false로 변경
...
  // REST API 3-1: get feedback
  useEffect(() => {
    if (props.status === 200) {
      axios
        .get(`${hostURL}/api/admin/feedbacks`)
        .then((response) => {
          setFeedbacks(response.data);
          setIsFeedbackLoading(false);
        })
        .catch((error) => {
          console.log(error);
        });
    }
  }, [props.status]);
...
- map 함수를 통해 최신 순으로 후기 목록 나열
- key를 feedback.id로 설정
return
...
  [...feedbacks].reverse().map((feedback) => (
    <div key={feedback.id} className={styles.feedbackStyle}>
      <div>{feedback.id}</div>
      <div>{feedback.content}</div>
    </div>
  )))}
...'React' 카테고리의 다른 글
| React로 커머스 사이트 만들기 (8)-2: AWS S3 + CloudFront 배포 (0) | 2023.09.24 |
|---|---|
| React로 커머스 사이트 만들기 (8)-1: AWS S3 배포 (0) | 2023.09.24 |
| React로 커머스 사이트 만들기 (6): 관리자 페이지(1) (0) | 2023.09.24 |
| React로 커머스 사이트 만들기 (5): 주문인증/주문조회 페이지 (0) | 2023.09.24 |
| React로 커머스 사이트 만들기 (4): 구매 Modal & 주문완료 페이지 (0) | 2023.09.24 |